
- Introduction
- Prerequisites
- Choosing a data source definition
- What are we building?
- Building a data source based on the example productizer
- General project setup and cleanup
- Adding models for the request and response
- Add logic to retrieve data
- Adding the route
- Deploy and host your productizer
- Register your data source in the Developer Portal
- Ensure you have a group
- Add your data source
- Test your data source
- Publish the data source
- Next steps
How to build a data source
Introduction
In this guide we will explain how to build a new data source or productizer and how to use the developer portal to publish it using the developer portal so it can be queried through the product gateway.
Prerequisites
- Data that you want to provide.
- A data source definition for the data.
- Ability to host an API that responds to POST requests on the public internet over the https protocol.
Choosing a data source definition
You can use the Data definition viewer to find available data source definitions. If there is no definition for the kind of data that you want to provide you can create your own definition by following the How to create data definitions guide.
What are we building?
In this guide we will build a productizer that provides an API matching the test/ioxio-dataspace-guides/Country/BasicInfo definition that we created in the How to create data definitions guide. As the definition is an OpenAPI spec you might want to use se some tool like the Swagger Editor to view it in a more human friendly format.
In this case it means we will create an API that accepts a POST request at the path /test/ioxio-dataspace-guides/Country/BasicInfo. It could for example be hosted at https://productizer.example.com/test/ioxio-dataspace-guides/Country/BasicInfo.
The POST request to that endpoint needs to accept a JSON payload, similar to this:
{
  "code": "FI"
}
It needs to respond with a JSON payload that could look like this:
{
  "code": "FI",
  "name": "Finland",
  "area": 338455,
  "languages": [
    "fi",
    "sv"
  ],
  "capital": {
    "name": "Helsinki",
    "lat": 60.170833,
    "lon": 24.9375
  }
}
If you already know how you can build this using your own preferred tools and how to host it, you can skip ahead to the section where we add the data source using the developer portal.
Building a data source based on the example productizer
We will use the FastAPI based example productizer as a starting point and just modify it to provide the country data instead. Feel free to fork the repository or just download the source code as an archive from GitHub to follow along.
General project setup and cleanup
You most likely want to update the README.md to better describe your own data source.
If you intend to use Poetry to manage your Python dependencies you should change the name of the project and authors found in pyproject.toml and run poetry install to install the dependencies so you then can run the productizer locally by running poetry run invoke dev. If you don't intend to use poetry you can delete the file.
You might want to set up pre-commit for your project or get rid of the .pre-commit-config.yaml file.
If you don't intend to use Docker for your data source, you can also get rid of the Dockerfile, .dockerignore and the docker directory.
Adding models for the request and response
Let's start by deleting the models related to the weather data (CurrentWeatherMetricRequest and CurrentWeatherMetricResponse) from the app/models.py, as we won't need them.
Next, let's add the definition for the request and response to app/models.py. We can directly copy the BasicCountryInfoRequest, Capital and BasicCountryInfoResponse classes from the final definition we created in the How to create data definitions guide. Note that we also need to add the necessary imports.
If you're building a data source for another definition, it's possible it was created using pydantic models, in which you can retrieve those from within the /src directory in the definitions repository. If they are not available you will have to build them yourself. In that case the same guide can be handy, as well as the official pydantic documentation and the Request Body section of the FastAPI docs.
The app/models.py file would after these changes look like this:
from typing import List, Optional

from pydantic import BaseModel, Field, constr
from stringcase import camelcase


class CamelCaseModel(BaseModel):
    class Config:
        alias_generator = camelcase
        allow_population_by_field_name = True


class HealthResponse(CamelCaseModel):
    status: bool


class BasicCountryInfoRequest(CamelCaseModel):
    code: str = Field(
        ...,
        title="Code",
        description="ISO 3166-1 alpha-2 code for the country",
        example="FI",
        min_length=2,
        max_length=2,
    )


class Capital(CamelCaseModel):
    name: str = Field(
        ...,
        title="Name",
        description="The name of the capital of the Country",
        example="Helsinki",
    )
    lat: float = Field(
        ...,
        title="Latitude",
        description="The latitude coordinate of the Capital",
        ge=-90.0,
        le=90.0,
        example=60.170833,
    )
    lon: float = Field(
        ...,
        title="Longitude",
        description="The longitude coordinate of the Capital",
        ge=-180.0,
        le=180.0,
        example=24.9375,
    )


class BasicCountryInfoResponse(CamelCaseModel):
    code: str = Field(
        ...,
        title="Code",
        description="ISO 3166-1 alpha-2 code for the country",
        example="FI",
        min_length=2,
        max_length=2,
    )
    name: str = Field(
        ...,
        title="Name",
        description="The name of the country",
        example="Finland",
    )
    area: float = Field(
        ...,
        title="Area",
        description="The area of the country in km^2",
        example=338455,
    )
    languages: List[constr(min_length=2, max_length=2)] = Field(
        ...,
        title="Official languages",
        description="ISO 639-1 language codes for the official languages",
        example=["fi", "sv"],
    )
    capital: Optional[Capital] = Field(
        None,
        title="Capital",
        description="The capital of the country, legislative if multiple",
    )
Add logic to retrieve data
We can delete the file app/openweathermap.py. You might find it a useful example in case your productizer will fetch data from some other system, but in our case we won't need it.
Instead we will create the file app/datasource.py with the following content:
from typing import Any, Dict

data = {
    "FI": {
        "code": "FI",
        "name": "Finland",
        "capital": {
            "name": "Helsinki",
            "lat": 60.170833,
            "lon": 24.9375,
        },
        "languages": ["fi", "sv"],
        "area": 338455,
    },
    "NR": {
        "code": "NR",
        "name": "Nauru",
        "capital": None,
        "languages": ["na", "en"],
        "area": 21,
    },
}


async def get_data(country: str) -> Dict[str, Any]:
    """
    Get the country data.

    This would in practice fetch the data from your underlying data source,
    such as a database, sensor or another API.

    :param country: Two-letter country code.
    :return: The data for the country.
    :raise KeyError: If no data is found for the country.
    """
    return data[country.upper()]
This contains just a hardcoded dictionary of different values and a simple wrapper to fetch them. In practice you would want to change this to actually somehow fetch or generate the necessary data. Note that you might also need to install some Python packages for connecting to and querying your database or other systems.
The original implementation required an API_KEY and an API_ENDPOINT, which our data source does not require, so we can remove those from settings.py. Those can however be handy examples for your own implementation.
Adding the route
Let's open the file app/routers/dataproduct.py. We start with emptying it, so we get rid of the old route.
Let's add our new route like this:
from fastapi import APIRouter
from fastapi.exceptions import HTTPException

from app.datasource import get_data
from app.models import BasicCountryInfoRequest, BasicCountryInfoResponse

router = APIRouter()


@router.post(
    "/test/ioxio-dataspace-guides/Country/BasicInfo",
    summary="Basic Country Info",
    description="Data Product for basic country info",
    response_model=BasicCountryInfoResponse,
)
async def data_product(params: BasicCountryInfoRequest):
    try:
        data = await get_data(params.code)
    except KeyError:
        raise HTTPException(404, "Country not found")

    return BasicCountryInfoResponse(**data)
We define the route for the path /test/ioxio-dataspace-guides/Country/BasicInfo, which matches the path for our definition and the path defined in the OpenAPI spec file. We also define which pydantic models we use for the request and for the response, as well as define some metadata for the route. We use our get_data function to retrieve the data, raising a 404 exception in case the country is not found. Finally we wrap the data into a BasicCountryInfoResponse. We could as well just return the data as a dictionary and let FastAPI take care of the rest automatically using the definition in the response_model.
The FastAPI documentation is really well written and describes in great detail topics, such as the request body, response models and handling errors, so those resources are well worth a look if the explanation in this guide was too brief.
Deploy and host your productizer
Deploy and host your productizer. For the next steps we will need the base URL at which it is responding, for example https://productizer.example.com.
Register your data source in the Developer Portal
Log in to the Developer Portal.
Ensure you have a group
In the menu navigate to My groups. If you don't yet have a group, create one. The name of the group should preferably relate to yourself, your company or the data source.
Add your data source
Use the menu to navigate to My data sources. Press the + ADD A DATASOURCE button.
In the Data product definition, pick the definition you used for your productizer.
Pick one of your groups in the dropdown for groups.
If you want to publish multiple data sources for the same definition using the same group, you can add a tag to distinguish them from each other. Most likely you don't want to use this for your first data source.
In the Source URL enter the base URL at which your deployment is available. The help text shows where the API endpoint is expected to be available. The Source URL will not be displayed to other users and is only used by the product gateway to connect to the productizer. All other applications must connect through the product gateway.
Leave the Published unchecked.
The filled in form would look like this:
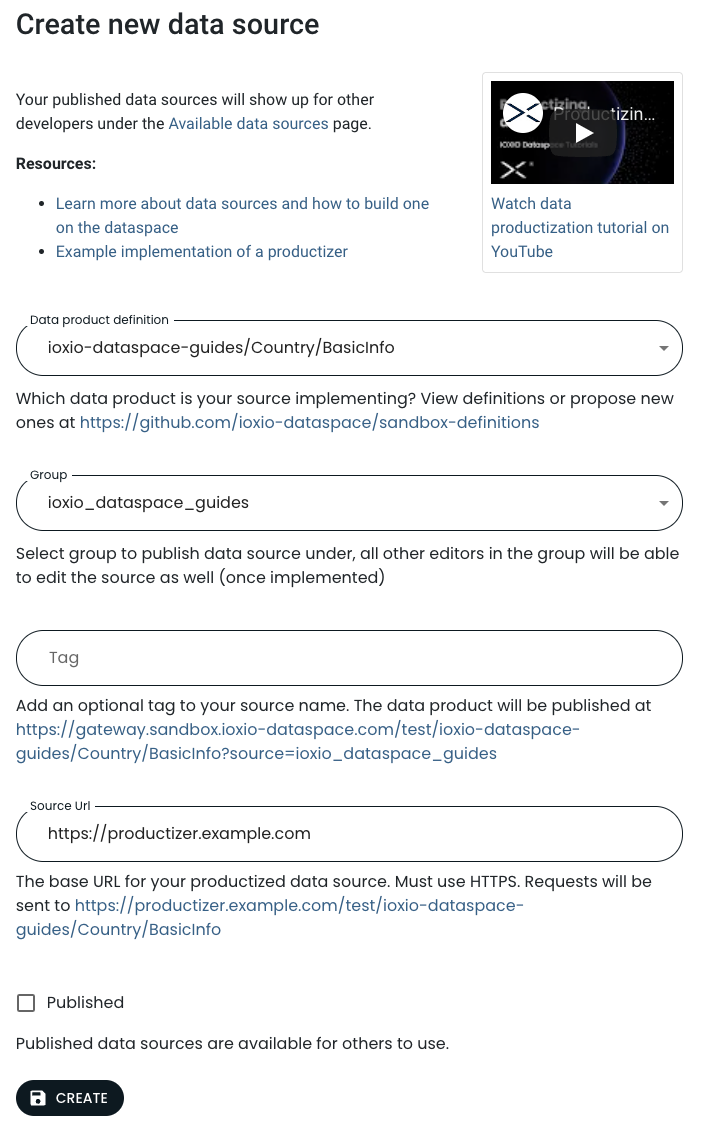
Finally press the CREATE button to create the data source.
Test your data source
You should now be able to test your own data source by querying it through the product gateway.
From the list of your data sources, press OPEN next to the data source you just created. The developer portal will show you the Request URL at which you can query your own data source as well as the X-Preview-Token necessary to use a data source until it has been published.
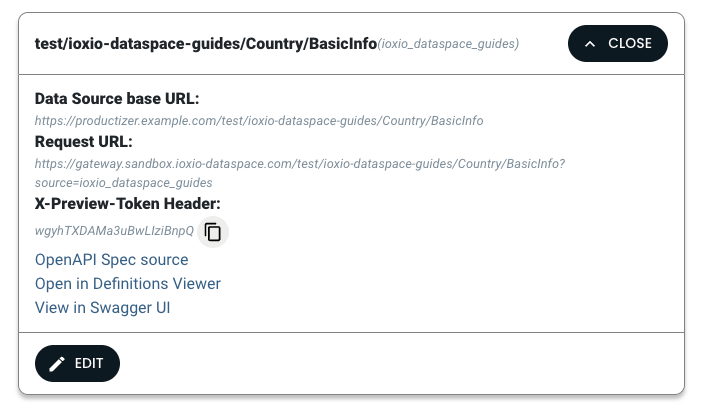
You can for example use the cURL command line tool to query it like this (make sure the replace the url and X-Preview-Token to the one shown to you in the developer portal and change the data to match the expected payload of your own data source):
curl --include \
  --request POST \
  --url 'https://gateway.sandbox.ioxio-dataspace.com/test/ioxio-dataspace-guides/Country/BasicInfo?source=ioxio_dataspace_guides' \
  --header 'Content-Type: application/json' \
  --header 'X-Preview-Token: wgyhTXDAMa3uBwLIziBnpQ' \
  --data '{"code": "FI"}'
HTTP/2 200
content-type: application/json
content-security-policy: base-uri 'none'; default-src 'none'; form-action 'none'; frame-ancestors 'none'
x-frame-options: DENY
x-content-type-options: nosniff
x-xss-protection: 1; mode=block
strict-transport-security: max-age=63072000
x-powered-by: Dataspace technology by IOXIO
x-cloud-trace-context: bdf665cf604f8eb05b5af0fe2f52e521;o=1
date: Mon, 15 Aug 2022 11:36:49 GMT
server: Google Frontend
content-length: 130

{"code":"FI","name":"Finland","area":338455.0,"languages":["fi","sv"],"capital":{"name":"Helsinki","lat":60.170833,"lon":24.9375}}
Note: As long as your datasource is not published you will need to use the X-Preview-Token header, once the datasource is published the header should be left out.
In case you make a request that causes an unexpected response to be generated by the productizer, like a 404 Not found message, the product gateway will respond with a 502 to indicate there was an error in the productizer:
curl --include \
  --request POST \
  --url 'https://gateway.sandbox.ioxio-dataspace.com/test/ioxio-dataspace-guides/Country/BasicInfo?source=ioxio_dataspace_guides' \
  --header 'Content-Type: application/json' \
  --header 'X-Preview-Token: wgyhTXDAMa3uBwLIziBnpQ' \
  --data '{"code": "ZZ"}'
HTTP/2 502
content-type: application/json
x-frame-options: DENY
x-content-type-options: nosniff
x-xss-protection: 1; mode=block
strict-transport-security: max-age=63072000
x-powered-by: Dataspace technology by IOXIO
x-cloud-trace-context: d1fed33eef8fa02f6fa160d28637884c;o=1
date: Mon, 15 Aug 2022 11:45:45 GMT
server: Google Frontend
content-length: 95

{"message":"Data source returned an error","status":404,"error":{"detail":"Country not found"}}
Publish the data source
When you've verified the data source works as intended you can publish the data source by selecting it in the list, pressing the EDIT button and ticking the Published checkbox and press the UPDATE button to save the changes. When it's published, it will be listed to all users in the Available data sources section and it will no longer require a X-Preview-Token header to be queried.
Next steps
If you created the data source definition under your own test/<your-own-name> namespace, you likely want to submit a pull request to copy it outside the test namespace and add a version or copy it to the repository used for definitions in a production Dataspace. Note that you will also need to adjust your productizer to accept the request at the updated path or ensure it will accept requests on multiple different paths.
When the definition has been published, you will need to add the data source once more. This time using the definition in the new path. If you want the data source to appear in the list of available data sources for other users of the Dataspace also tick the Published checkbox.
You might want to clean up by removing the old data source definition by submitting a pull request to remove it as well as delete your old data source in the developer portal. Please note that this will make it impossible to query it, so make sure to update any applications that might be using it before deleting either one.
Due to this danger the deletion of the data source is slightly hard to reach. Open My data sources page in the developer portal and press OPEN next to the data source to reveal the EDIT button. Press it to go to the edit view, where you can press the DELETE button. You will still be prompted to confirm the deletion.