
- Introduction
- Creating an application
- What features does the IOXIO® Dataspace bring to an application?
- Data Products
- Authentication
- Consent
- Using data products
- Finding a data source definition
- API Docs
- Data definition viewer
- GitHub repository
- No matching definition?
- Finding an available data source
- Requesting the data from a data source
- Authenticating users
- Using consent
- Check if consent is required
- Data Source Identifier
- Consent Request Token
- Request consent
- Redirect the user to the consent portal
- Request the consent token
- Using the consent token
How to build an application
Introduction
Building an application for an IOXIO® Dataspace is not much different from building any other web-based or mobile application. IOXIO® Dataspace supports both building applications from scratch and upgrading existing applications to take advantage of features from a Dataspace. In fact, it mainly offers a way to extend the functionalities of applications compared to what we see today.
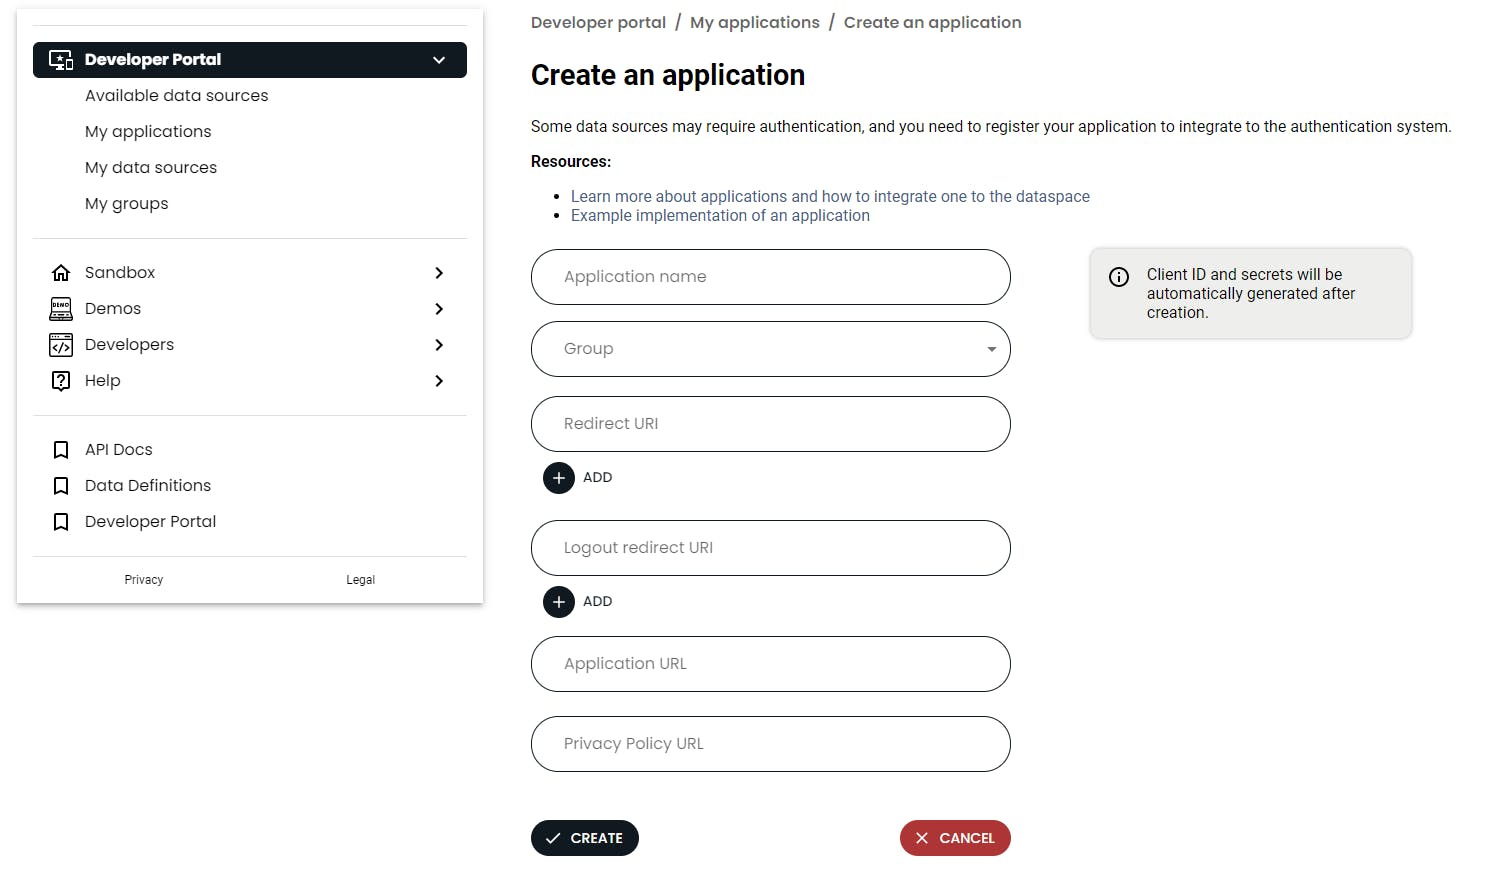
Creating an application
Go to my applications submenu in the developer portal and click on the button to add an application. Fill in all the necessary fields, select a group and click the Create button. You'll have to pick one of the groups you must have created beforehand. The steps required for creating a group are detailed in the Creating a Group guide.
What features does the IOXIO® Dataspace bring to an application?
Data Products
Data Products allows the application to access data in a standardized format, following a data product definition. Multiple different vendors can publish data sources complying with the same definition, making it easy to switch the provider of the data. Data sources are accessed through the product gateway, which validates the request and response data complies with the definition. Data sources can be accessed without any authentication, requiring authentication or by requiring consent.
Authentication
The authentication provider of an IOXIO® Dataspace can be used for authenticating the users using the OpenID Connect code flow, thus simplifying the authentication process.
Applications are however not required to implement any kind of authentication at all and can use their own authentication solutions as long as they only use data sources which do not require authorization or consent. Using the authentication provider can however save time compared to implementing an authentication solution from scratch, unify the user experience with other applications on the Dataspace and make it easier to later extend the functionality by using data sources that require authorization or consent.
Consent
In case any of the data sources used by the app require a consent from the user, the app needs to use both the authentication provider for authentication and the consent portal for consents in order to be able to fetch the data product.
Using data products
Finding a data source definition
The first step to use a data product is to find out what data you need and which data source definition provides that data.
There are multiple ways you can view the data source definitions to find the one you need.
API Docs
In the API Docs -> Product Gateway -> Data Products you can view more detailed information about all the data source definitions, as well as see examples of both the request and response payloads for them.
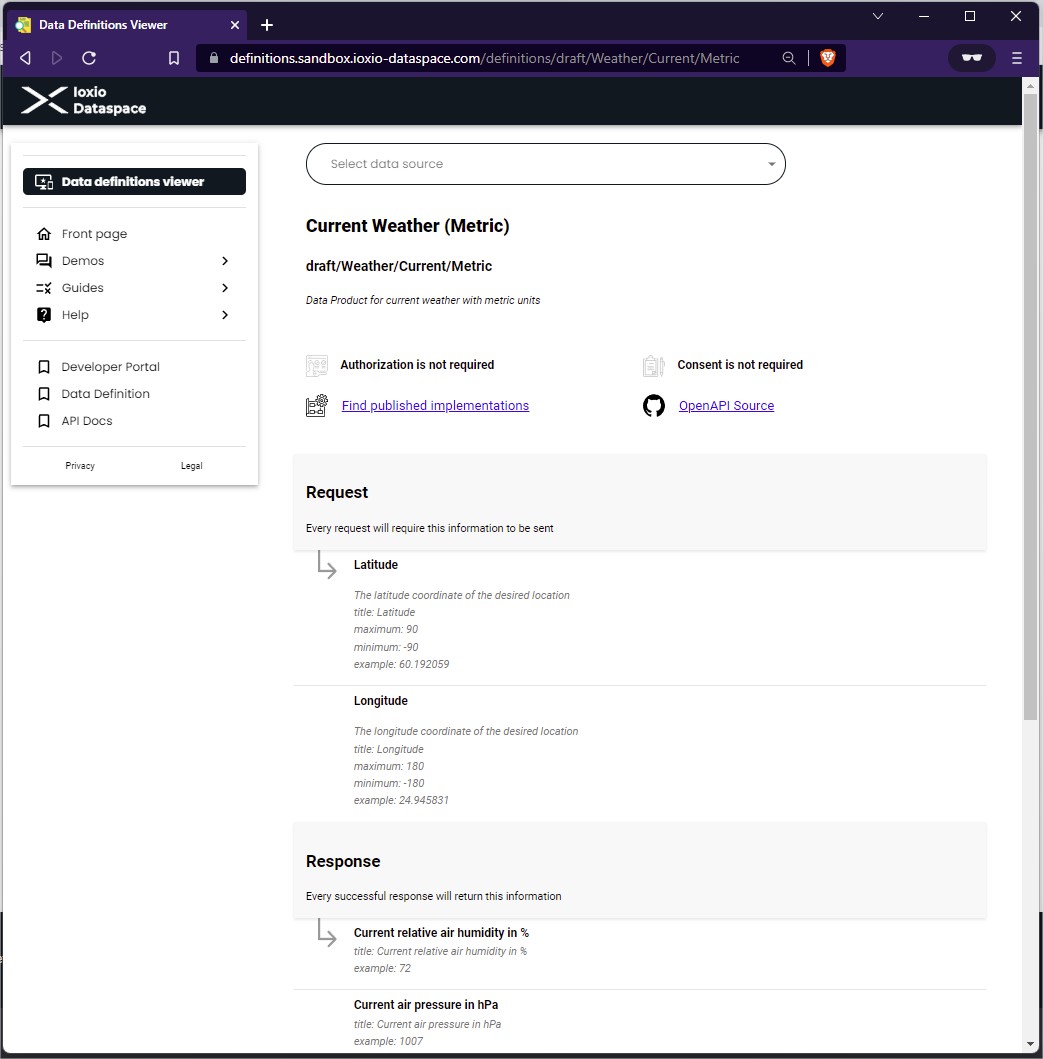
Data definition viewer
The Data definition viewer is targeted to less technical people and can be used to browse data sources definitions in a simplified and understandable way. This tool is targeted also for business and non-technical users familiarizing and using IOXIO® Dataspace services.
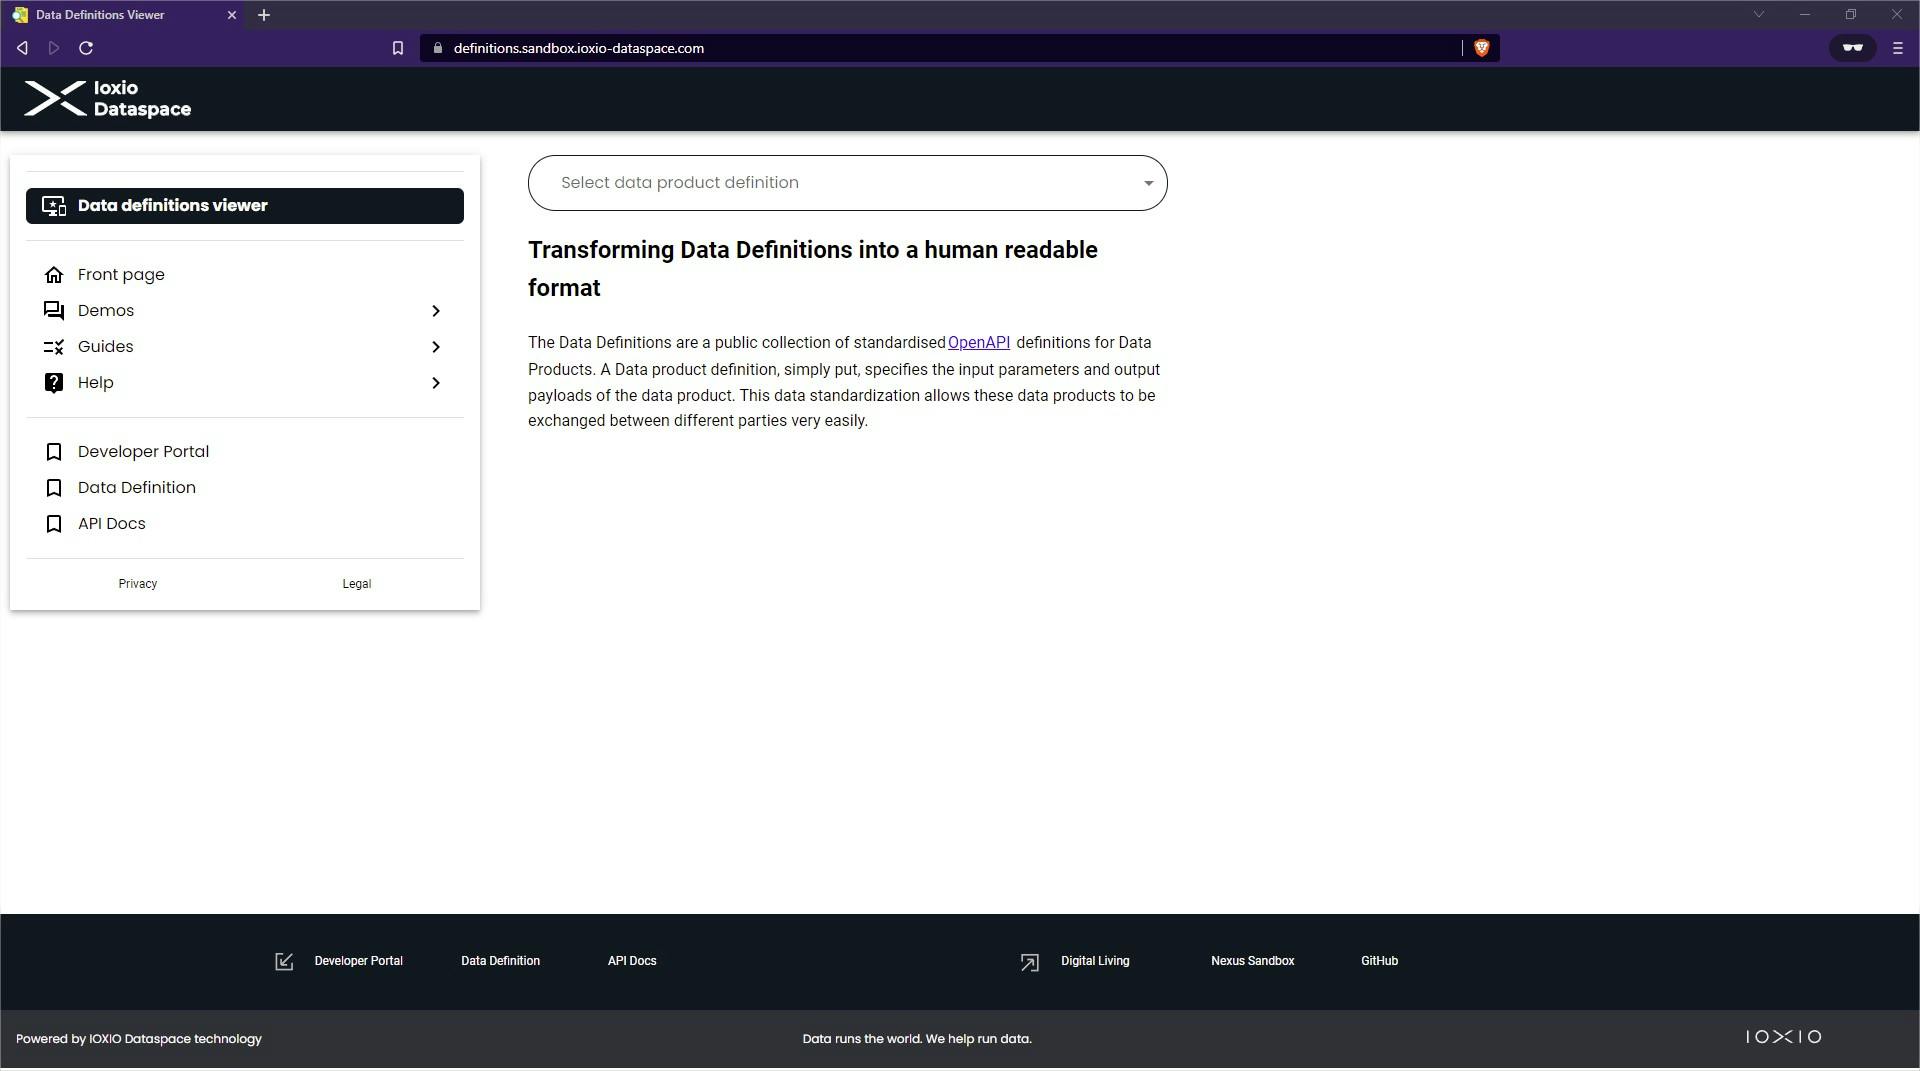
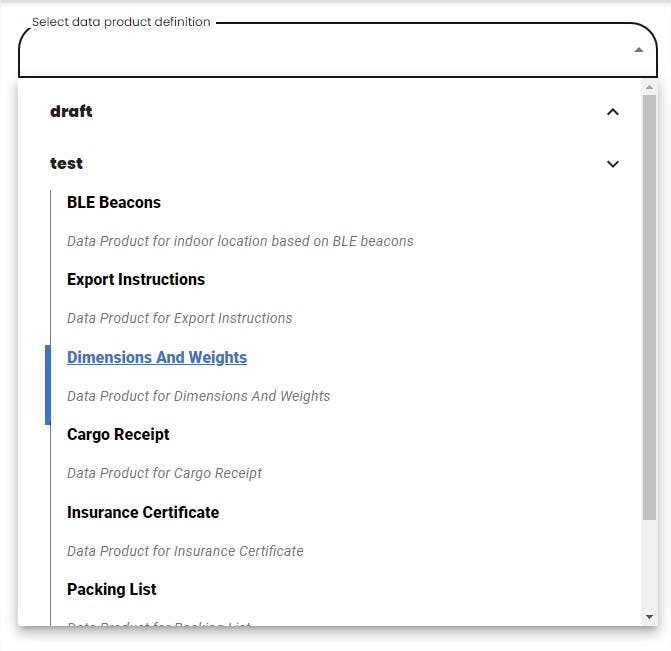
The Select data product definition dropdown can be used to drill down different categories to find data sources by category, like Weather, under which you could find the current weather in metric units.
The details view will show you what data is needed as input and what kind of data is included in the response.
GitHub repository
If you prefer to look at the raw OpenAPI Spec files or use some specific tool for inspecting them, you can go to the GitHub repository for the sandbox-definitions. The data source definitions are found in the DataProducts directory.
No matching definition?
If you don't find any data source definition providing the data you need, you can also consult the guide How to create data definitions to create your own definition. The definition alone is of little use unless someone also provides a data source for the data. The guide How to build a data source explains how you or someone else could build a data source for the definition.
Finding an available data source
Log in to the developer portal and navigate to the Available data sources section and use the dropdown to list the available data sources for the desired definition.
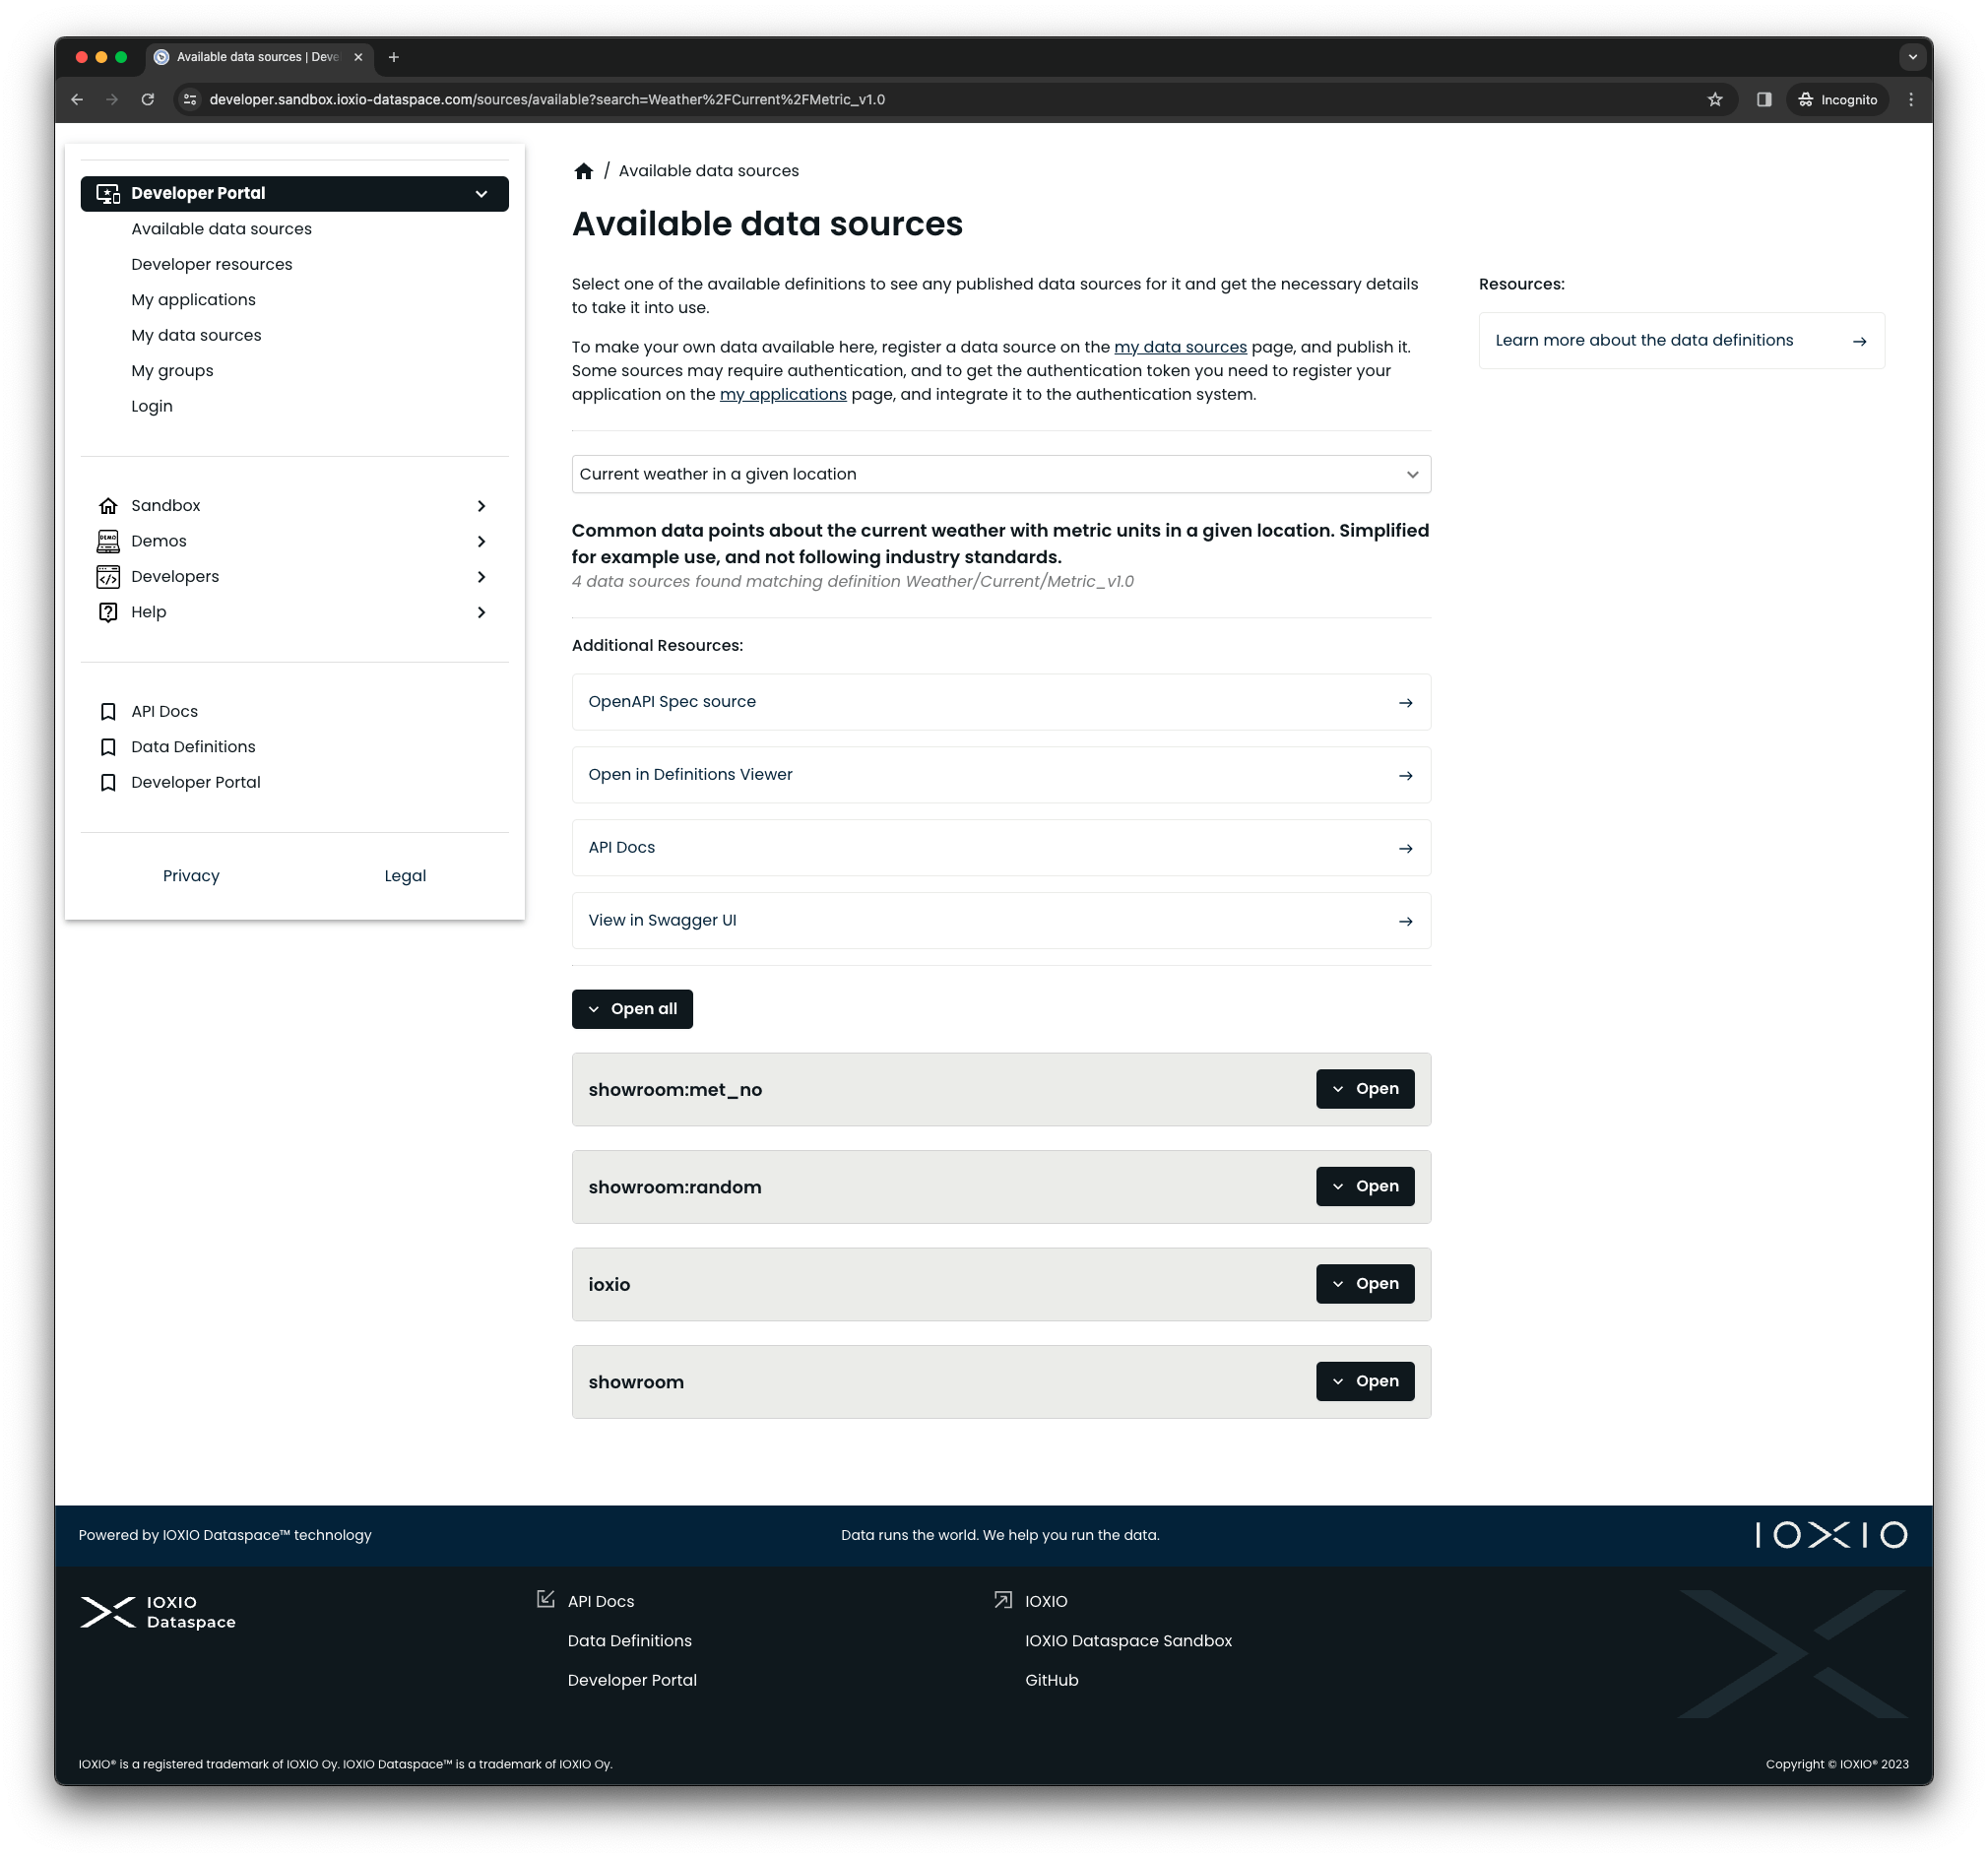
You will get a list of all different data sources providing that data.
If there are no matching sources, you might want to consider building your own data source or request someone to build it, following the How to build a data source guide.
Requesting the data from a data source
If you press the OPEN button next to any of the found items in the developer portal, it will expand and conveniently show you the Request URL for the source:
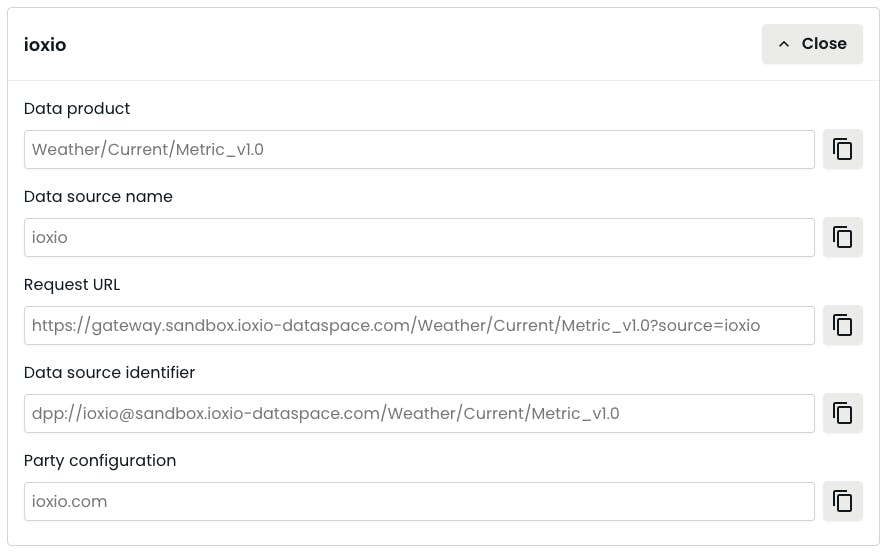
This shows the URL at which you can query the product gateway to get the data from this particular source. For the same definition, the only thing that will change depending on the source is the ?source= query parameter. It's thus easy to later change the source to another that provides the same data.
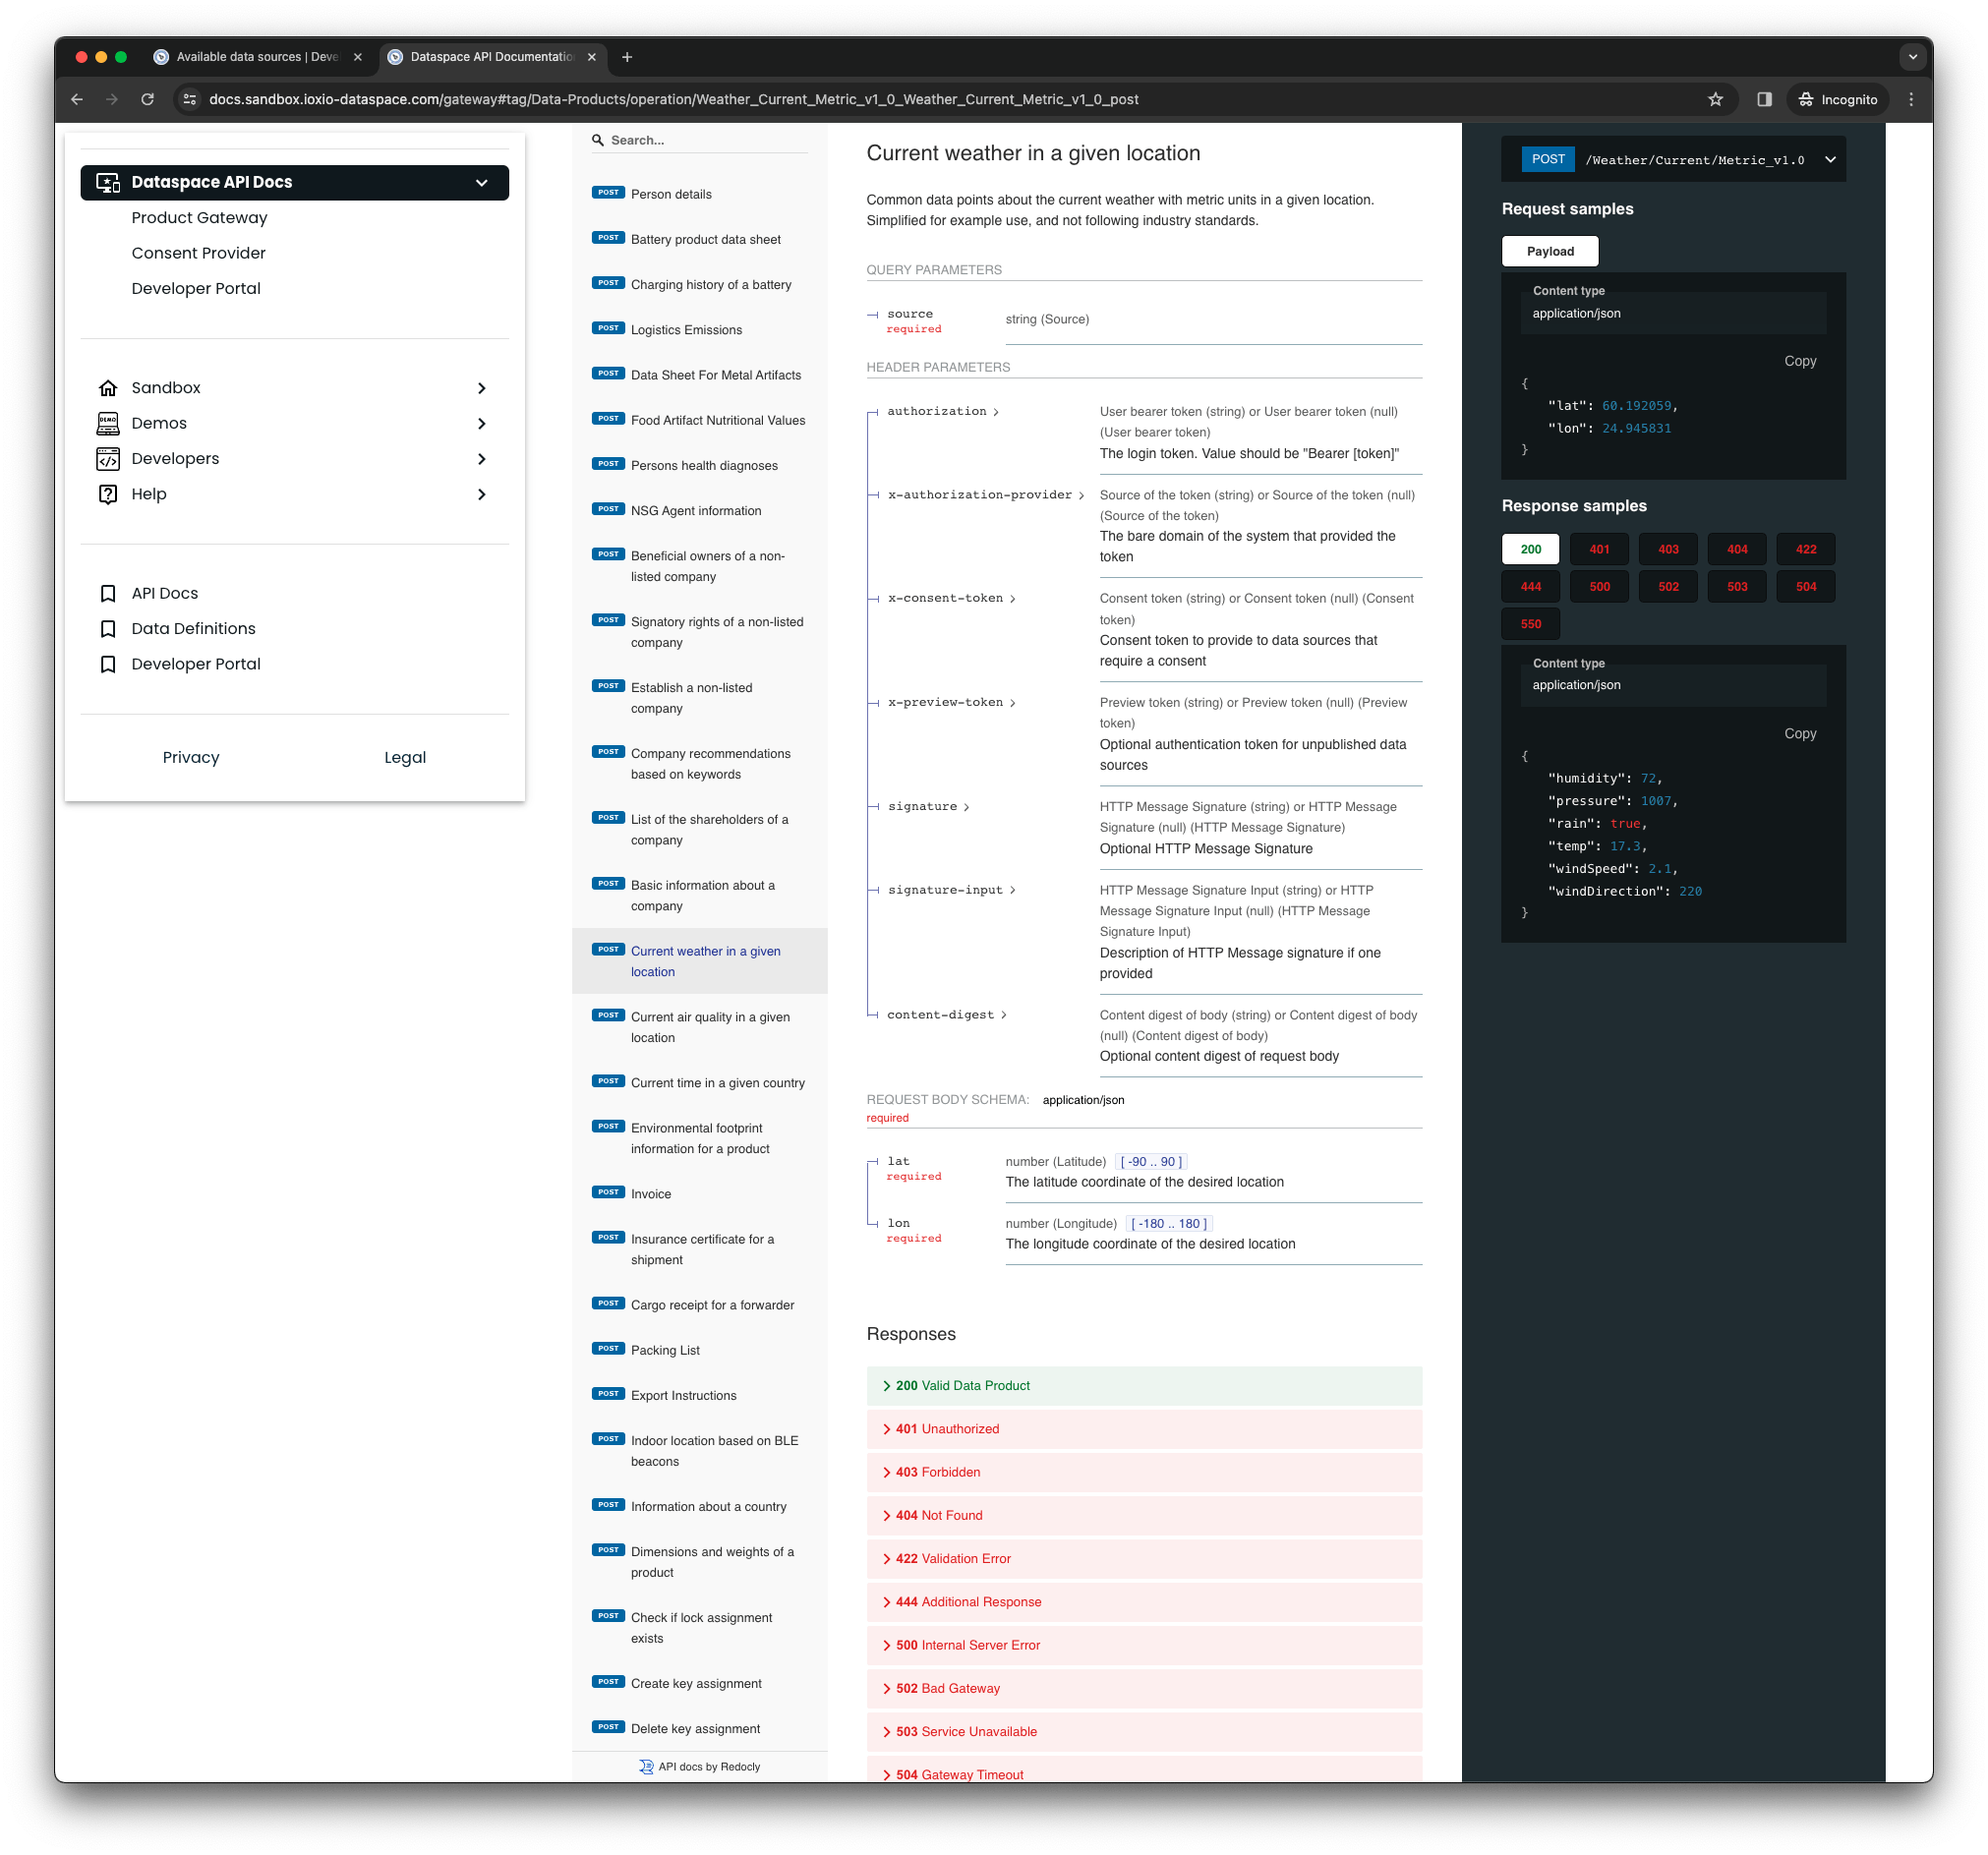
In order to request the data, you need to know what data to include in the request. The required data is best explained in the Product Gateway API Docs for Data Products. In the section Weather/Current/Metric_v1.0 you can see an example:
The request to data products are always POST requests with the Content-Type set to application/json.
The Authorization and X-Consent-Token headers can be either optional or required.
If the Authorization header is required you will need to pass in the header with a value of the form Bearer <id_token>, where <id_token> is the ID Token the for the logged in user. In practice the header will be of the form Bearer eyJ....
If the X-Consent-Token is required, a Consent Token needs to be passed in the header. Note that the consent token is not prefixed with anything, the token is used as-is in this header.
Later sections of this guide will explain how to authenticate the user to get an ID Token and how to use the Consent Portal to request the consent from a user to get a Consent Token.
The body of the request would need to contain the data described in the definition. For example to query for the weather in Helsinki using the definition mentioned earlier you could use this data:
{
   "lat": 60.192059,
   "lon": 24.945831
}
The response would follow the description in the definition and could for example for Helsinki look like this:
{
   "humidity": 72,
   "pressure": 1007,
   "rain": true,
   "temp": 17.3,
   "windSpeed": 2.1,
   "windDirection": 220
}
In practice, you likely want to do data product requests through your own backend rather than in your frontend or on the client side. First of all CORS would make it hard to perform the request from the client side, especially in web based applications. In addition, you might want to do some pre- or post-processing to the request, like for example map a city or address to a coordinate (possibly using some other data product) or fetch some additional data. Or maybe just include some of the data in some other response. You might also in some cases want to cache some generic data that doesn't change frequently and doesn't depend on the user. You might also want to monitor your own use of different data sources and even be able to easily switch the source without rolling out an update of the frontend or mobile app.
Authenticating users
There's a separate guide called Use login portal in your application that goes into details on how you register your application and use the login portal for authentication to obtain the id_token for a user.
Using consent
The Consent protocol summary explains the flow for requesting consent and outlines the overall design. This guide focuses on implementing the necessary parts of it in your application so you can request consent from the user, obtain a consent token and use it to fetch the data product.
Check if consent is required
The data source definition can indicate that the X-Consent-Token is required for a particular definition if it is always required. It's also possible to mark it as optional, in which case each data source can decide if it's required or not. If it's required and missing, the productizer will respond with the status code 403 to the request from the product gateway. The product gateway will use this information and respond to you with the status code 502 and a JSON body with the field status set to 403, which is your indication that consent is required.
Data Source Identifier
For the consent request, you will need the Data Source Identifier (DSI) for the data source. It's a Data Product Protocol link of the form dpp://<source>@<dataspace-domain>/<definition>.
Let's see how to create it for this data source:
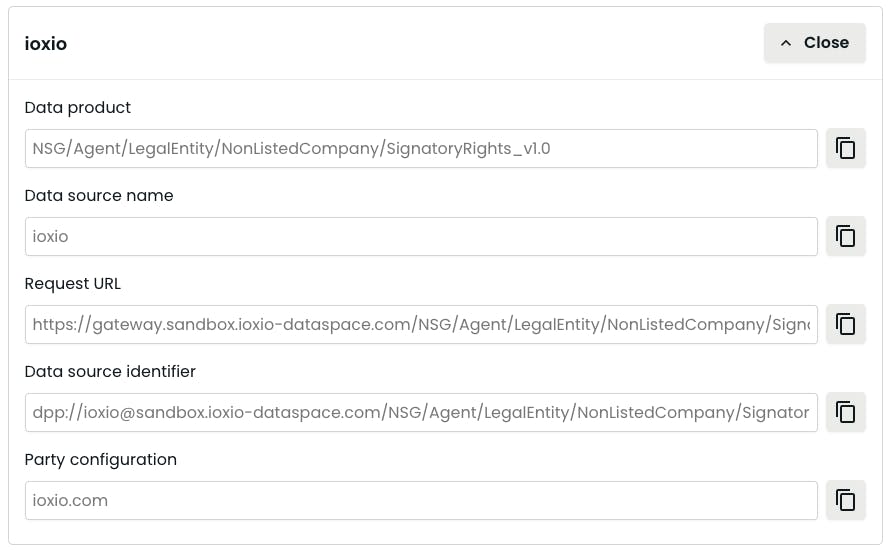
The source is ioxio, the dataspace-domain (the bare one for the Dataspace, not the one for the product gateway) is sandbox.ioxio-dataspace.com. And the definition is NSG/Agent/LegalEntity/NonListedCompany/SignatoryRights_v1.0. Using the pattern for the Data Source Identifier, it thus becomes dpp://[email protected]/NSG/Agent/LegalEntity/NonListedCompany/SignatoryRights_v1.0.
Consent Request Token
For consent requests you need to have a consent request token. How do you get this:
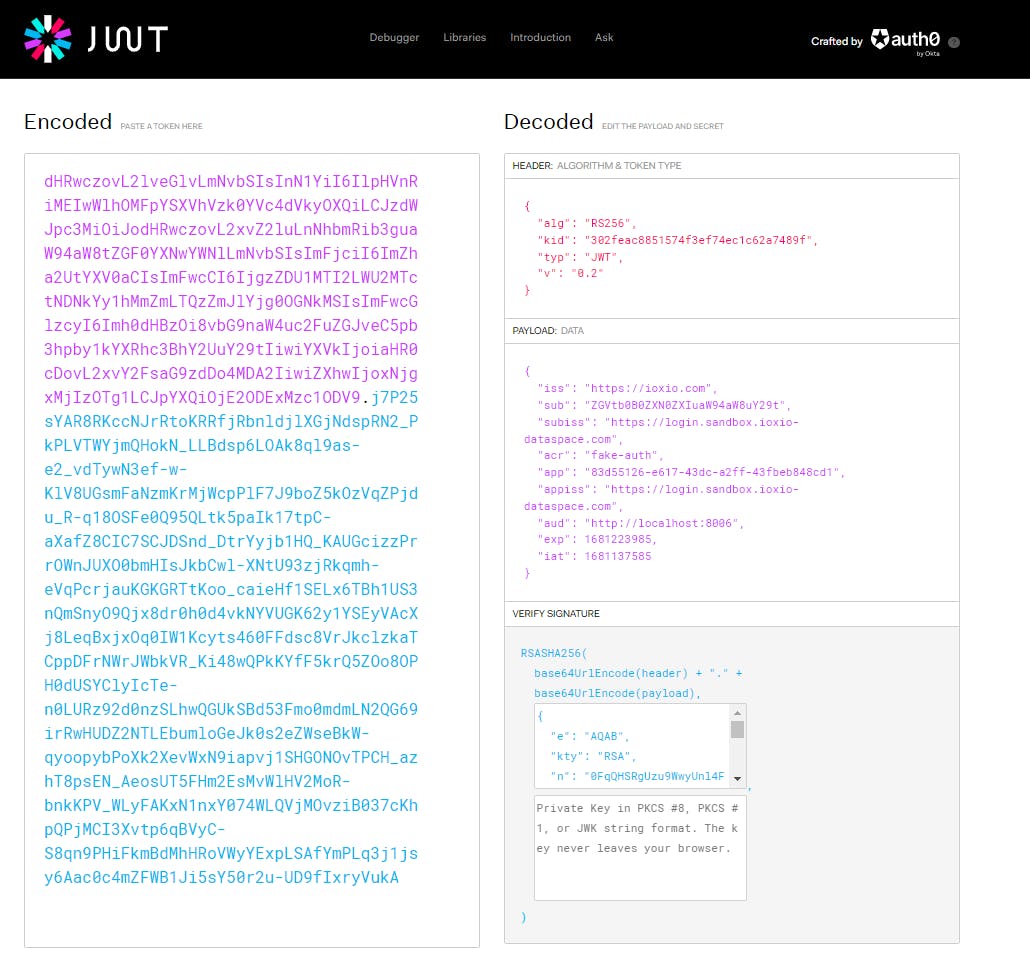
This is a JWT that you have to create and it needs to have the following extra information in the header (the kid needs to match one of the keys you published through the party-configuration for the group of your application and v must be "0.2", for now the alg should be set to "RS256"). Below is an example of what should be contained in the header and body. The JWT should be signed with the key corresponding to the kid used in the header. You can check out the consent request token page to get details of each field.
Header
{
    "v": "0.2",
    "kid": "2d149479-88a6-4141-ad4c-b14c92f430bc",
    "alg": "RS256"
}
Body
{
    "iss": "https://example.com",
    "sub": "debade8a-091d-42da-9b0c-e61f9471e2c3",
    "subiss": "https://login.sandbox.ioxio-dataspace.com",
    "acr": "fake-auth",
    "app": "bb8c7f74-0855-42e1-ba09-70bb27103ded",
    "appiss": "https://login.sandbox.ioxio-dataspace.com",
    "aud": "https://consent.sandbox.ioxio-dataspace.com",
    "exp": 1678492800,
    "iat": 1678406400
}
Here is an example of what a decoded Consent Request Token could look like when decoded at jwt.io:
Request consent
In order to be able to request consent from the user you will need to first authenticate the user and obtain the id_token for the user. This is explained in the Use login portal in your application guide. You will also need the Data Source Identifier and Consent Request Token both described above.
The consent request is created by doing a POST request to the /Consent/RequestConsents endpoint on the Consent Portal, for example, https://consent.sandbox.ioxio-dataspace.com/Consent/RequestConsents. The Content-Type header has to be set to application/json and the X-Consent-Request-Token header should contain the consent request token. You can request multiple consents at a time.
The JSON body of the request should be an array of consent requests with each having the dataSource field set to the Data Source Identifier and the required field set to either true or false. True means if consent is denied for it then consent will be denied for every other one while False means it's optional and denying it consent doesn't affect others. The body could thus look like this:
{
  "consentRequests": [
     {
        "dataSource": "dpp://[email protected]/NSG/Agent/LegalEntity/NonListedCompany/SignatoryRights_v1.0",
        "required": true
     }
  ]
}
Expressed as a cURL command the whole request would look like this:
curl --request POST \
  --url 'https://consent.sandbox.ioxio-dataspace.com/Consent/RequestConsents' \
  --header 'Content-Type: application/json' \
  --header 'X-Consent-Request-Token: eyJhbGciOiJSUzI1NiIsImtpZCI6IjMwMmZlYWM4ODUxNTc0ZjNlZjc0ZWMxYzYyYTc0ODlmIiwidHlwIjoiSldUIiwidiI6IjAuMiJ9.eyJpc3MiOiJodHRwczovL2lveGlvLmNvbSIsInN1YiI6IlpHVnRiMEIwWlhOMFpYSXVhVzk0YVc4dVkyOXQiLCJzdWJpc3MiOiJodHRwczovL2xvZ2luLnNhbmRib3guaW94aW8tZGF0YXNwYWNlLmNvbSIsImFjciI6ImZha2UtYXV0aCIsImFwcCI6IjgzZDU1MTI2LWU2MTctNDNkYy1hMmZmLTQzZmJlYjg0OGNkMSIsImFwcGlzcyI6Imh0dHBzOi8vbG9naW4uc2FuZGJveC5pb3hpby1kYXRhc3BhY2UuY29tIiwiYXVkIjoiaHR0cHM6Ly9jb25zZW50LnNhbmRib3guaW94aW8tZGF0YXNwYWNlLmNvbSIsImV4cCI6MTY4MTM5NTAyMiwiaWF0IjoxNjgxMzA4NjIyfQ.EE3vJ9HqfLfkscv2vMSZ_-2-BCyAt4HIUPUlmiNSD3oti38lDiZ-bR0eiLGb8aOolYJSKirXUvIRIE_0N-xDxGzX0Xoie3RIavU1id8IxksnDDSdPOttOlwYghv0jtEqMRGj9GGxrcXfOY2DSe7uDfRZfmZaiwsYVOmFws4SI3vI2rYvmLiIFNZhluFQgDHNgoR1MVN5lchQG-99wJTX_Dtqztfa_gvdHXvS9jVkqfzf4bYyEubWtNFRg93wdBfM7Q2oFWjuldf38G9y62pW07UDgjy1Us8POTAk6veCTpBnKIgDwVIn4x5gqnAaxiLP-BrkPs13BmKAaDB-m41AHv9lm8P3MWVijO5Gh9-q9Rq2rpzyOTehdgFsGKSSy6dvwoVM3lyhG6AJLarzCzia1RCmK5ZmfOPlshXAx89grLFrp_XCmq4j0dzLsW6XbN1xhkhE9U6vurULXNpJk-ytl8TlEWBJJMwkA4IlrnswhFQ62yUc1LqHNYjEgrir4eMmhhY1Sja5Zd8wPKcMkDJljYVQ_ftFt04AguaCISuLw1t2f9kluWv-abOzyeGaoh5-yOKyTEk-STa6j40Tm4_66oxExXIsjsY6ir2bsXKXhQ00HbneEmOGd4WxfNX0SUK8cAlFkyh3FD3a-nnK-H34rjzUQ0NU_cOW1BKn4VCwT2w' \
  --data '{
            "consentRequests": [
               {
                  "dataSource": "dpp://[email protected]/NSG/Agent/LegalEntity/NonListedCompany/SignatoryRights_v1.0",
                  "required": true
               }
            ]
          }'
and the response would look similar to this if the user has already granted all the consents:
{
  "type": "allConsentsGranted"
}
If that is the case then you can skip to requesting the consent token.
It would look similar to this if the user has not yet granted the consent:
{
 "type": "requestUserConsent",
 "missingConsents": [{"dataSource":"dpp://[email protected]/NSG/Agent/LegalEntity/NonListedCompany/SignatoryRights_v1.0","required":true}],
 "requestUrl": "https://consent.sandbox.ioxio-dataspace.com/request/86c0c7e6-4453-41c3-b20b-857ea41ea67b"
}
Redirect the user to the consent portal
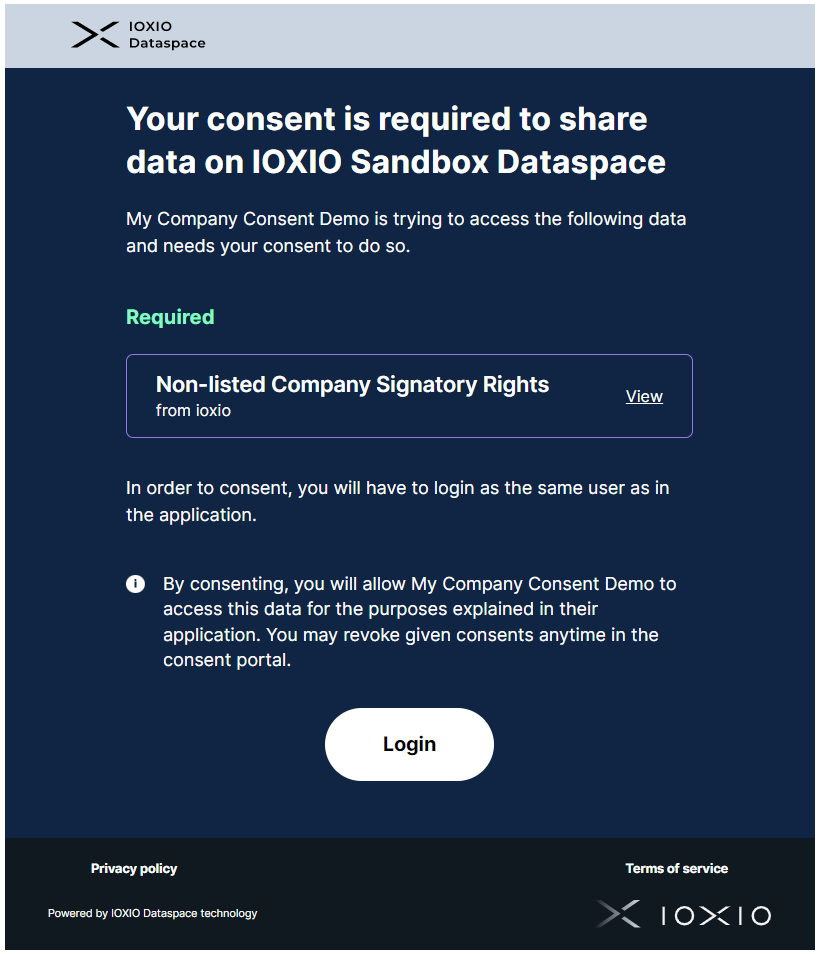
In order to request the consent you need to redirect the user to the requestUrl, but you should also add the query parameter returnUrl to indicate where the consent portal should redirect the user to after giving the consent (or declining it). Thus you would be redirecting the user to something similar to https://consent.sandbox.ioxio-dataspace.com/request/86c0c7e6-4453-41c3-b20b-857ea41ea67b?returnUrl=https://my-app.example.com
The user will be displayed a prompt to log in:
The consent can be granted after logging in:
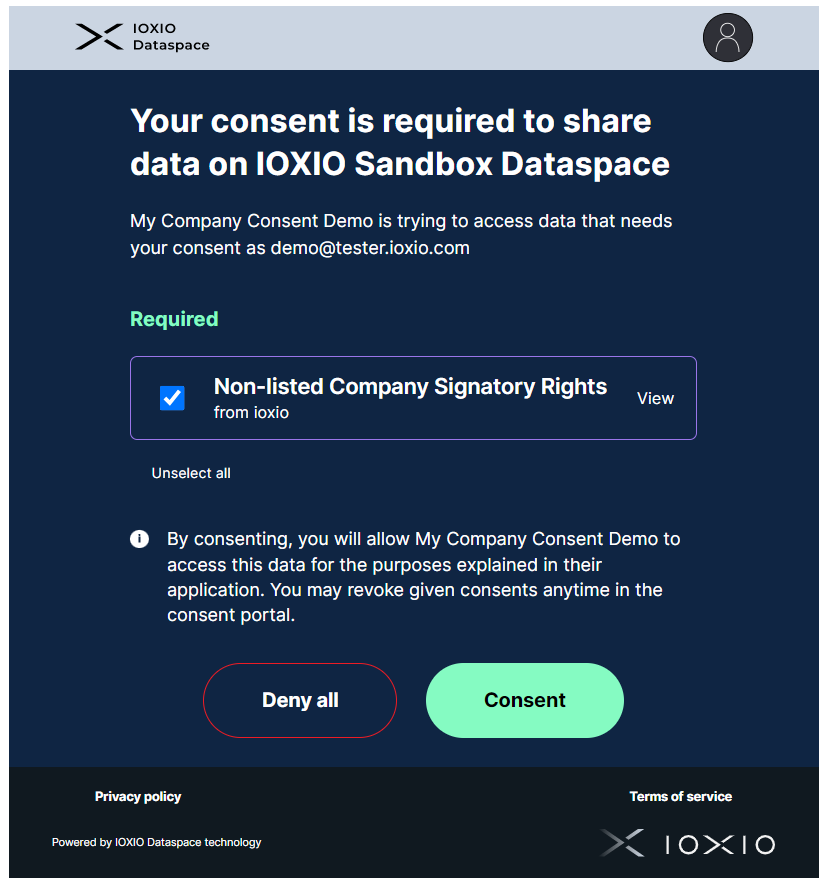
The user will be redirected back to the return URL with an added ?status=fail or ?status=success query parameter, e.g. either to https://my-app.example.com/?status=fail or https://my-app.example.com/?status=success.
Request the consent token
When the user has returned you need to retrieve the consent token. This is done by sending a POST request to the /Consent/GetToken endpoint. The Content-Type header has to be set to application/json and the X-Consent-Request-Token header should contain the consent request token. The JSON body should be the dataSource field set to the Data Source Identifier i.e.
curl --request POST \
  --url 'https://consent.sandbox.ioxio-dataspace.com/Consent/GetToken' \
  --header 'Content-Type: application/json' \
  --header 'X-Consent-Request-Token: eyJhbGciOiJSUzI1NiIsImtpZCI6IjMwMmZlYWM4ODUxNTc0ZjNlZjc0ZWMxYzYyYTc0ODlmIiwidHlwIjoiSldUIiwidiI6IjAuMiJ9.eyJpc3MiOiJodHRwczovL2lveGlvLmNvbSIsInN1YiI6IlpHVnRiMEIwWlhOMFpYSXVhVzk0YVc4dVkyOXQiLCJzdWJpc3MiOiJodHRwczovL2xvZ2luLnNhbmRib3guaW94aW8tZGF0YXNwYWNlLmNvbSIsImFjciI6ImZha2UtYXV0aCIsImFwcCI6IjgzZDU1MTI2LWU2MTctNDNkYy1hMmZmLTQzZmJlYjg0OGNkMSIsImFwcGlzcyI6Imh0dHBzOi8vbG9naW4uc2FuZGJveC5pb3hpby1kYXRhc3BhY2UuY29tIiwiYXVkIjoiaHR0cDovL2xvY2FsaG9zdDo4MDA2IiwiZXhwIjoxNjgxMjIzOTg1LCJpYXQiOjE2ODExMzc1ODV9.j7P25sYAR8RKccNJrRtoKRRfjRbnldjlXGjNdspRN2_PkPLVTWYjmQHokN_LLBdsp6LOAk8ql9as-e2_vdTywN3ef-w-KlV8UGsmFaNzmKrMjWcpPlF7J9boZ5kOzVqZPjdu_R-q18OSFe0Q95QLtk5paIk17tpC-aXafZ8CIC7SCJDSnd_DtrYyjb1HQ_KAUGcizzPrrOWnJUXO0bmHIsJkbCwl-XNtU93zjRkqmh-eVqPcrjauKGKGRTtKoo_caieHf1SELx6TBh1US3nQmSnyO9Qjx8dr0h0d4vkNYVUGK62y1YSEyVAcXj8LeqBxjxOq0IW1Kcyts460FFdsc8VrJkclzkaTCppDFrNWrJWbkVR_Ki48wQPkKYfF5krQ5ZOo8OPH0dUSYClyIcTe-n0LURz92d0nzSLhwQGUkSBd53Fmo0mdmLN2QG69irRwHUDZ2NTLEbumloGeJk0s2eZWseBkW-qyoopybPoXk2XevWxN9iapvj1SHGONOvTPCH_azhT8psEN_AeosUT5FHm2EsMvWlHV2MoR-bnkKPV_WLyFAKxN1nxY074WLQVjMOvziB037cKhpQPjMCI3Xvtp6qBVyC-S8qn9PHiFkmBdMhHRoVWyYExpLSAfYmPLq3j1jsy6Aac0c4mZFWB1Ji5sY50r2u-UD9fIxryVukA' \
  --data '{"dataSource": "dpp://[email protected]/NSG/Agent/LegalEntity/NonListedCompany/SignatoryRights_v1.0"}'
This time the response would look similar to this:
{
  "type": "consentGranted",
  "consentToken": "eyJ..."
}
Note! The consent token has a somewhat short lifetime. However, using the same get token request it's possible to get a new token as long as the consent remains valid.
The response will look like this if consent has not been granted or has been revoked
{
  "type": "missingConsent"
}
In that case, you have to go back to requesting consent
Using the consent token
Once you've got the consent token for the user, you can do a request to the data source through the product gateway. Just remember to add the Authorization header with the id_token as a Bearer Token and the consent token in the X-Consent-Token header.
Using cURL the request would look similar to this:
curl --request POST \
  --url 'https://gateway.sandbox.ioxio-dataspace.com/NSG/Agent/LegalEntity/NonListedCompany/SignatoryRights_v1.0?source=ioxio' \
  --header 'Content-Type: application/json' \
  --header 'Authorization: Bearer eyJ...' \
  --header 'X-Consent-Token: eyJ...' \
  --data '{"nationalIdentifier": "SWE: 5560125791"}'